


I’m cheap. Like seriously cheap. So when I wanted to go test Cloud Management Gateway (CMG) with eHTTPS and a public cert I knew I would already be in for some money from my MSDN subscription to run the CMG/CDP instance. Yes, yes, I know… a one year cert from most providers is about $20-30. But seriously - did I already mention I’m cheap?
The thought immediately crossed my mind - I already use Let’s Encrypt for my website, I should be able to use it for CMG/CDP right? I mean, it’s a publicly trusted web certificate so why wouldn’t it work? So I took the thought and turned it into reality. (Un)surprisingly it totally works! I guarantee you that it will cost your company more money in labor costs having you do this every three months rather than going through your current cert vendor for a cert with a longer validity period, but maybe someone needs to know this. Maybe you’ve found yourself in a position where you need a temporary cert while you wait on your security team. In any case, here are the steps to generate your own Let’s Encrypt certificate for your CMG/CDP instance.
What you need
- OpenSSL (or whatever tool you’d like to combine your .CRT and .KEY file into a .PFX)
- Access to your external DNS provider (you’ll be creating TXT records)
Getting Started
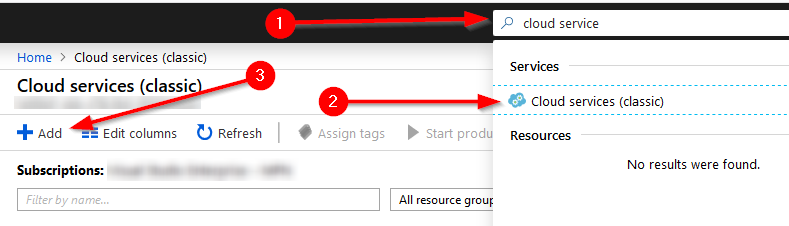
So we’re going to follow the same steps we would normally follow to check the availability of our CMG name. Remember it has to be unique because the instance is going to be deployed to “cloudapp.net” as a legacy service - I assume that “cmg.cloudapp.net” is already taken. Load up your Azure Portal. Navigate to “Cloud Service (Classic)” - this is easily accessed via the search bar. Press the “Add” button.
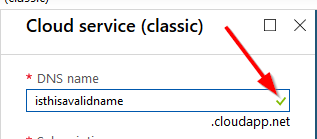
Now type in the name you want to use. It can be almost anything (there is a character limit - it needs to be 3-24 characters long). If you get a green checkbox, the name is available and you should be able to use it.
Now that we’ve validated the name is available, we can move on to generating our certificate.
Generating Your Certificate
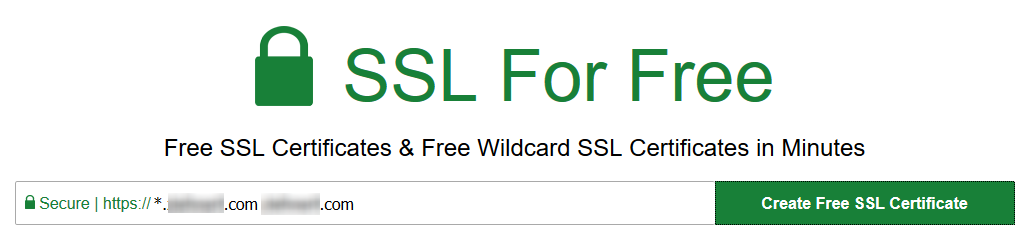
I like to use a site called SSLForFree. You can use whatever ACME service you would like for generating your certificates (I just like the alerts that SSLForFree sends me as well as how easy they make the process). I can’t vouch for the security of their site, so do your own research. They will walk you through the process pretty well, but I’ll also walk you through it here.
Open up a web browser and navigate to https://sslforfree.com. On the main page type in the name of your service and external domain - for example “cmg.contoso.com”. If you would rather generate a wildcard cert you will type in “*.contoso.com contoso.com”
NOTE: The order is very important here. If you choose a wildcard cert you need to make sure the wildcard is first otherwise the way the certificate is processed in ConfigMgr will try to generate a service at the root of your domain. No bueno.
Press the “Generate Free SSL Certificate” button and then we’ll be asked how we want to validate our domain. In the case of a wildcard cert, the only option available is DNS - in the case of a named certificate you have a few other options. Only DNS is going to work in our situation, so choose it. (The reason DNS is the only solution that works in this case is because we don’t have the ability to publish anything at that endpoint currently without standing up a webserver.)
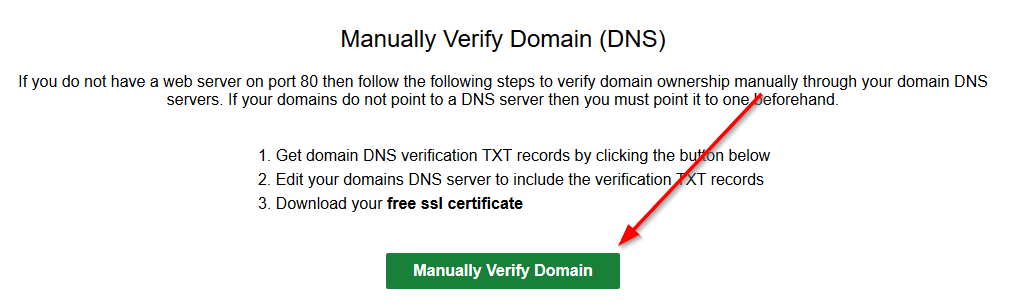
You’re now going to be presented with one or two challenge codes you need to put in DNS as TXT records. These need to go on your public/external DNS. I won’t tell you how to do that - but in general this is a pretty simple process depending on the DNS provider. Put those TXT records in and wait for them to propagate. There is a link on the page that will allow you to verify they have properly propagated. If you use CloudFlare this will be nearly instant (in the case that they are new - if you update a record it could take 2-10 minutes, or more depending on your TTL settings).

Finally press the “Download SSL Certificate” button and you’ll be presented with a page with a bunch of text. Near the bottom there will be an additional button to ACTUALLY download the certificates and key. Download and extract these certificates to a location that you can access from a command prompt.
Next we need to combine the certificate into a PFX file to be consumed by IIS. This will require OpenSSL, so if you haven’t already installed it, do so now. Open up a command prompt and change directory into the OpenSSL BIN folder. You’ll run the following command:
openssl pkcs12 -export -out "c:\path\to\exportedCert.pfx" -inkey "c:\path\to\private.key" -in "c:\path\to\certificate.crt" -certfile "c:\path\to\ca_bundle.crt"
Now you’ll be asked for a password to protect the certificate file - choose a password and then verify it. Now you have your certificate exported and ready for use in building your CMG/CDP.
Build your CMG/CDP
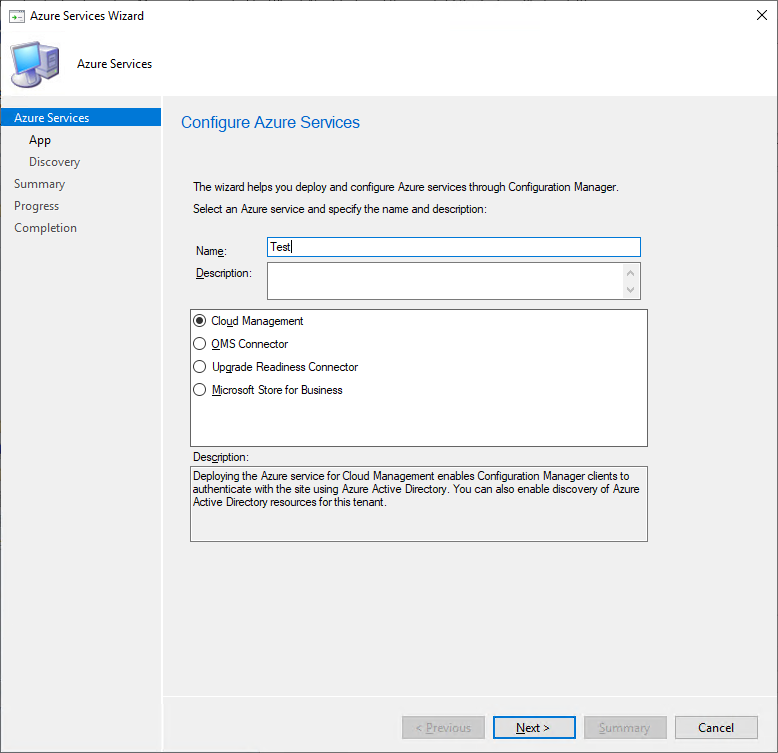
This process is stupid simple. Kudos to the ConfigMgr development team for making the path to cloud adoption simple. If I could improve one thing about the process it would be to login before generating the name of the applications (you’ll see more about that later) but overall this process is great. So we need to open up the ConfigMgr console. Once in the console load up Administration > Azure Services. We need to create our Cloud Management Gateway service so that we can use Azure Resource Manager deployment process.
Right-click on “Azure Services” and select “Configure Azure Services”. On the first page, give your service a name (it can be whatever you desire), make sure that “Cloud Management” is selected, and then press “Next >”
Select the Azure Environment you want to run your CMG/CDP in (Public or Government) and then we’re going to create a couple of “App Registrations” - the good news is that we don’t have to do this manually. All we need to do is logon to our Azure tenant with an account with “Application Administrator” rights to the AzureAD tenant.
Click on “Browse…” for the Web app and then press “Create…” - give your application a unique name (for your tenant), a unique “HomePage URL”, and a unique “App ID URI” (it can be the same as the homepage URL). Select a validity period for the secret key and then sign in!
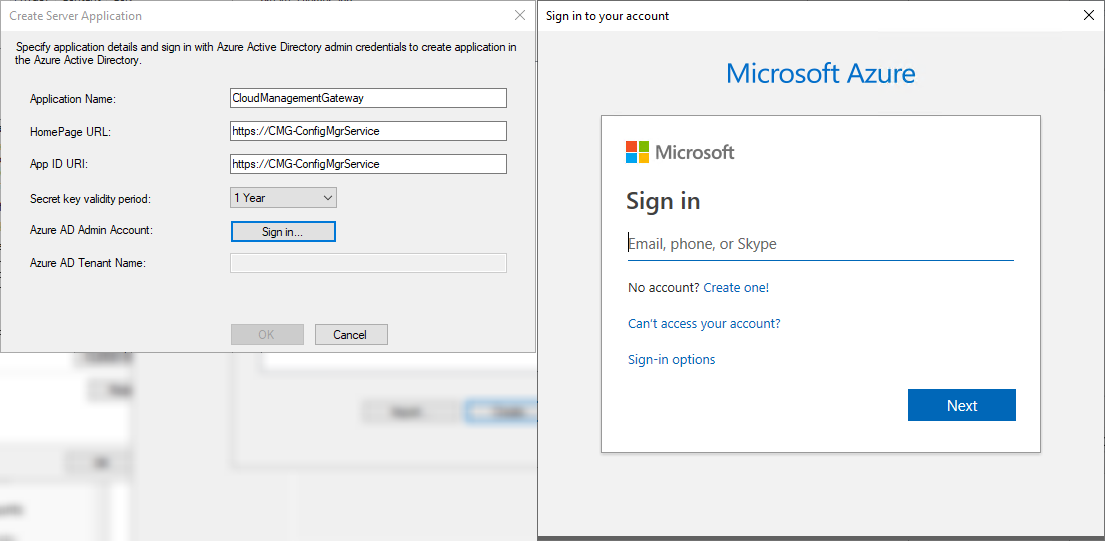
The Web App will be automatically provisioned for you. If you happen to get an error and you know you have the correct permissions, there is a high likelihood you have not used a unique name for your app or for the App ID URI. Select the server app you just created and then press OK. Now we will create the native client application - this is even easier than the last step. Click “Browse…” for Native Client app, and then select “Create…”. Give your native client application a unique name and then sign in!
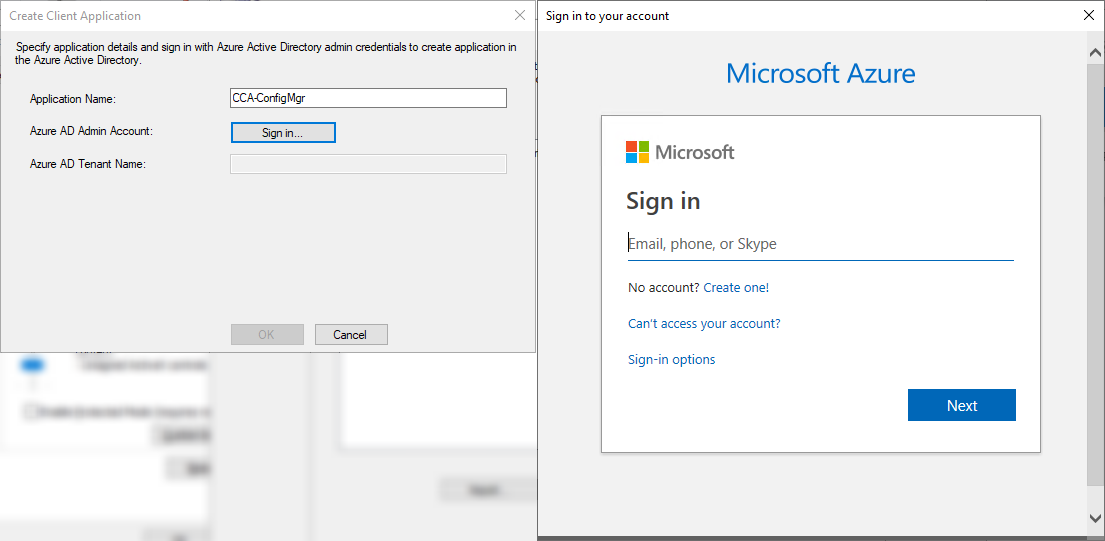
The Native Client app will be provisioned for you. Select the app you just created and then press OK. Select “Next >” and decide whether you want to enable Active Directory User Discovery or not. I’d recommend yes. Click through to the end and then close the window!
Now we need to create our actual Cloud Management Gateway instance. Right click on the “Cloud Management Gateway” and then select “Create Cloud Management Gateway”. Sign in with an account who has “Owner” privileges on the subscription in the Azure tenant you want to create the CMG/CDP in. Choose the subscription ID and then press “Next >”.
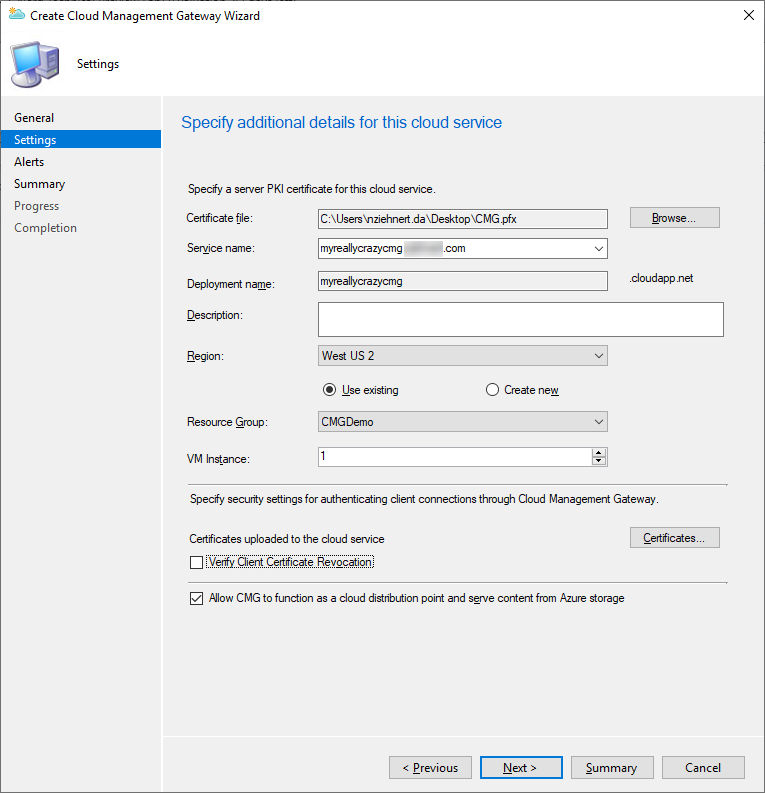
Now browse to the certificate we created earlier. Enter the password used to create the certificate. If you created a wildcard certificate previously you will receive an error message warning you that the certificate is a wildcard. You can safely ignore this.

If you’re not using a wildcard certificate the service name will be populated for you. If you are using a wildcard certificate, you’ll need to set the service name manually. This name should follow the convention of SERVICENAME.domain.tld where SERVICENAME is the name of the service we chose earlier, and then domain.tld is the domain you created the certificate for. Choose a region, resource group, and the number of VMs you want to deploy (each one can handle up to around 16,000 clients simultaneously).
If you are authenticating your clients via PKI then you need to upload any Trusted Root certificates from your domain(s) here as well. If you don’t publish your CRL externally then uncheck the box for “Verify Client Certificate Revocation”. Additionally if you want to use the CMG as a CDP, make sure the box labeled “Allow CMG to function as a cloud distribution point and serve content from Azure storage” is checked.
On the next page you can define alerts and thresholds for outbound data transfer as well as storage thresholds. Set what you feel is appropriate for your budget here and then press “Next >”. On the summary page press “Next >” and then “Close” and your CMG/CDP will begin deploying. This could take a few minutes so go grab a beer and pat yourself on the back!
Final Configuration
Now we need to do a couple more things:
- We need to create a CNAME record in DNS to point our service name to the CloudApp.net domain.
- We need to create a “Cloud Management Gateway Connection Point” in our environment.
Back in your external DNS console create a CNAME record for “SERVICENAME.domain.tld” to “SERVICENAME.CloudApp.net”. Allow this to propagate (you can test by pinging it). If your domain externally is the same as your internal domain you may also need to create a CNAME record in your internal DNS as well.
Now to create the “Cloud Management Gateway Connection Point” we just need to find a site server to put it on. This is pretty easy. Navigate to “Administration > Site Configuration > Servers and Site System Roles”, right click on the site server you want to add the role to, and then select “Add Site System Roles”. Click “Next >” through to “System Role Selection” check the box for “Cloud Management Gateway Connection Point” then press “Next >”. Select the name of the CMG then press “Next >” through to the end and then press “Close”.
Now you’re done! Mostly. You now need to enable “Cloud Management Gateway” traffic for the SUP and for the Management Point. Do this on whatever servers you wish to host these roles and the now you’re ready to rock.
Closing Thoughts
Okay, so we blew through the last few steps there - if there is interest in me expanding on that, I’m happy to do so. The main point of this post however was to show that using a free certificate from LetsEncrypt is still a viable solution as well. Does it work? Absolutely! Does it save your company any money? Definitely not - I doubt that generating a new certificate every three months is a cost effective solution. Maybe your lab? Anyways, as always, happy admining!
Share this post
Twitter
Facebook
Reddit
LinkedIn
Email