


A special thanks to Stephen Owen (FoxDeploy) and by proxy Boe Prox (Learn PowerShell) for the inspiration behind this script. I know that Stephen has his own version of a script like this and I won’t claim that this is any better - just a “different” approach. Here are a few of the differences:
- In this script XAML is split out into separate files rather than loaded into the script directly.
- This script does not run the dialog box in a separate thread so the console will be tied up until the dialog closes.
- This script uses a custom class containing a synchronized hashtable and an additional two methods which means this script also requires PowerShell v5 to execute.
Don’t worry if none of this makes sense to you - it’s not necessary to understand fully as we’ll be covering all of it over the next series of blog posts.
The “framework” script is available here: https://github.com/theznerd/PoSHPF/ and I’ll be documenting it’s use over the next few blog posts. Today’s post will focus on the basics.
Building Your First GUI with PoSHPF
The first thing we need to do is build the GUI we want to display. If you have not already installed Visual Studio Community then you should do so now. Make sure to include the components necessary to Visual C# development.
PLEASE NOTE: You will want to review the license terms of VS Community with your legal team if you do not plan on sharing your code under an Open Source Initiative (OSI) license. The license is pretty open, and we’re not really “developing” anything with it - just using the tool to build GUIs. However, I imagine (I am not a lawyer) that even just using the tool to build GUIs might be considered “use” in this case. If your company is large enough, they might even just have some VS licenses laying around. It never hurts to ask.
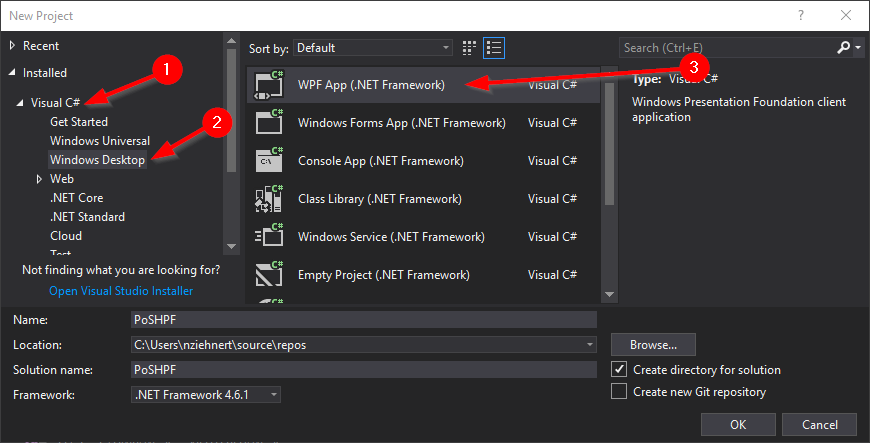
With that disclaimer out of the way (and provided you have installed some flavor of Visual Studio) let’s get to it. Launch Visual Studio and create a new “WPF App (.NET Framework)” project. Give it a fancy name (since it won’t matter in the end) and a location to save content to. Since this is a new project, a “Solution” will also be created for you.
While not necessary to understand for our purposes imagine a “solution” as a collection of integrated projects. Each project would be a separate EXE or DLL that you are developing.
The first thing that happens when we create a new solution is we are dropped directly into our “MainWindow.xaml” file. Very convenient for our purposes! The base XAML that is built looks something like this:
<Window x:Class="PoSHPF.MainWindow"
        xmlns="http://schemas.microsoft.com/winfx/2006/xaml/presentation"
        xmlns:x="http://schemas.microsoft.com/winfx/2006/xaml"
        xmlns:d="http://schemas.microsoft.com/expression/blend/2008"
        xmlns:mc="http://schemas.openxmlformats.org/markup-compatibility/2006"
        xmlns:local="clr-namespace:PoSHPF"
        mc:Ignorable="d"
        Title="MainWindow" Height="450" Width="800">
    <Grid>

    </Grid>
</Window>
Notice the format is just like XML - because that’s basically what it is. Microsoft calls it “eXtensible Application Markup Language”. You have the following:
- A root element called “Window” with some attributes like Title, Height, and Width
- A child element called “Grid” which is one of the two “layout” controls available to you in WPF (the other being “StackPanel”)
Your grid in this case is where all of our controls (buttons, text boxes, etc.) are going to live. Let’s keep things easy this time around - we’ll resize our window and just drag a couple controls into it. First you can resize the window by dragging on the sizing handles

or by finding the “Height” and “Width” attributes in XAML and setting them directly.

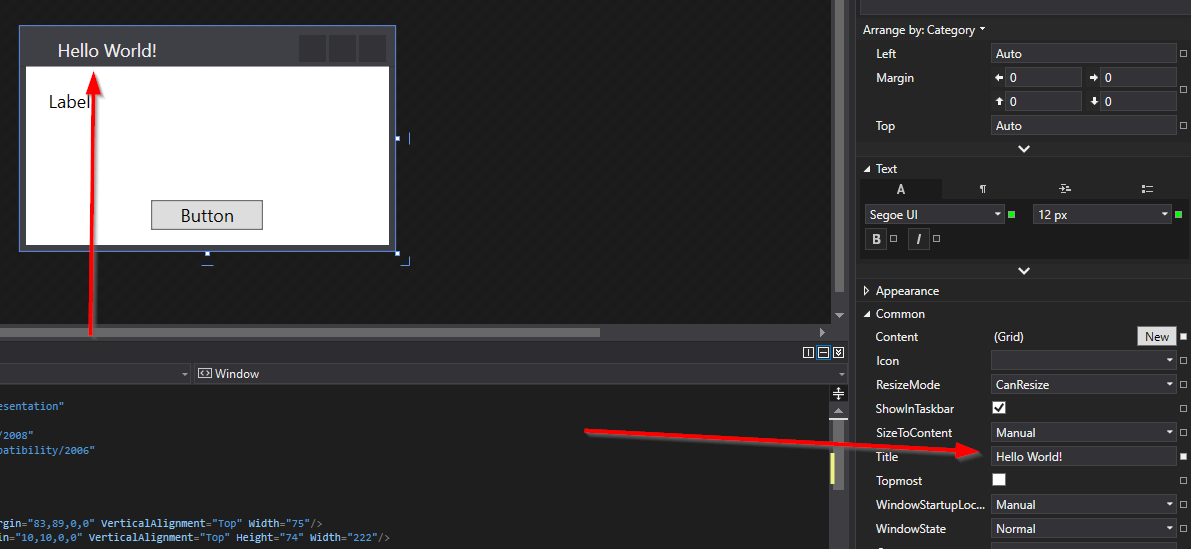
I prefer the latter because when you click and drag you can get some strange sizing (how is 242.14582 pixels displayed on a monitor?). While we’re working on our window let’s make sure we give it a proper name. “MainWindow” doesn’t really tell us much now does it? Let’s open the properties frame and find the “Title” property. This should be available to you on the right hand side of your VS window. If it’s not, you can open it from the menu bar “View > Properties Window”. Give your new GUI a name that reflects what the script will do - in our case we can call it “Hello World!”.
Now for our controls. How about a button and a label? On the left hand side of your VS window you should see a “Toolbox” which contains these items. Just click and drag them into the design view (or if you want to challenge yourself, you can drag them into the XAML view). If you don’t see the “Toolbox” then it is also available from the menu bar “View > Toolbox”.
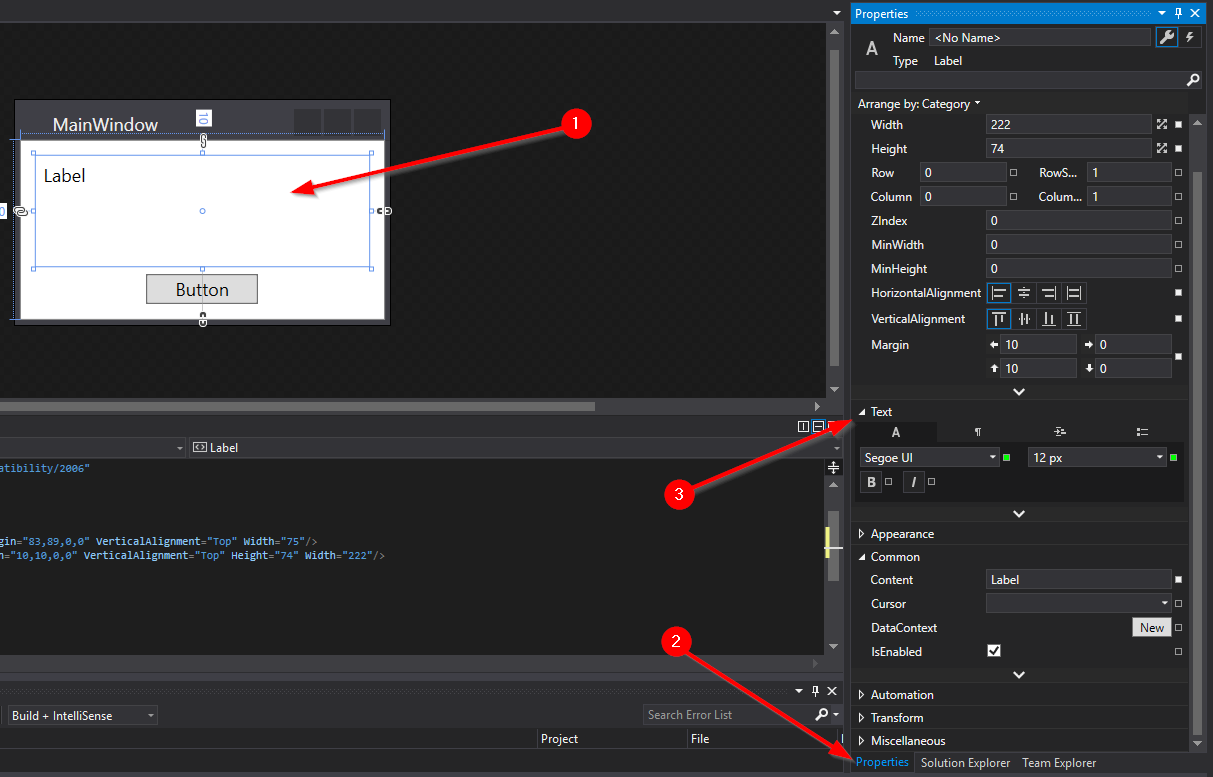
Now you can explore the properties available to you on these controls - like the font, alignment, or color. Click once on one of your elements, and on the right side of your VS window there should be a properties window available to you. Expand the “Text” section and select a fun font (because why not!)
If you accidentally double click on some elements in your window you might notice that you end up in scary C# code land. This is because Visual Studio is trying to be super helpful and wiring up an action like “Button Click” to some code. To undo this, just go back to your XAML window and press Ctrl+Z (or select Edit > Undo).
Now make sure to save your work and then we’ll move on to actually displaying it!
Launching the GUI with PoSHPF
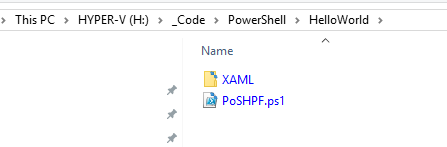
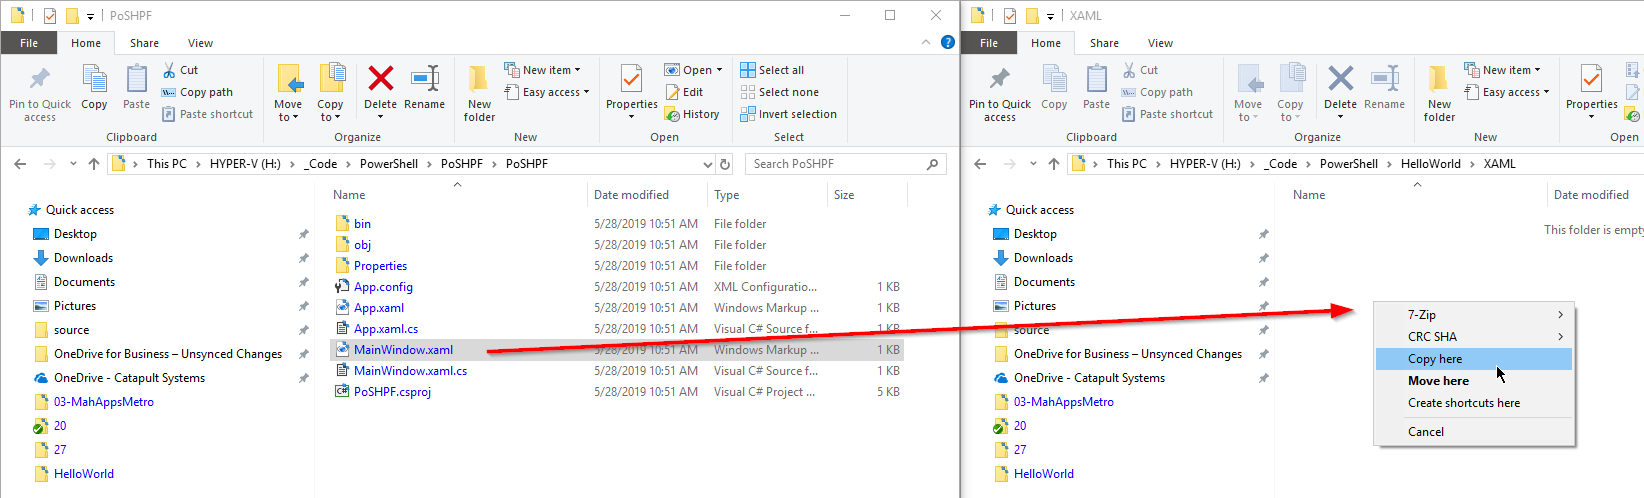
Now that our GUI has some controls in it, let’s get it loaded into the PowerShell Presentation Framework (PoSHPF). Download a copy of the latest PoSHPF from my GitHub Account and save it to a new folder. Inside that folder create another folder called “XAML”. Your directory structure will look something like this:
Now we need to get our “Hello World” window into this XAML folder. Open the folder that contains the project we created earlier, find “MainWindow.xaml” and then copy it into the XAML folder we just created.
Now we need to tell PoSHPF which window (the only window…) to load. Open the PoSHPF.ps1 script in whatever flavor of PowerShell editor you prefer.
If you’re not using VSCode, I would recommend taking a look at it! It is pretty darn sweet and only getting better.
Ignore all of the code up top and scroll all the way to the bottom. You’ll see a line that is commented out:
#[void]$formMainWindow.ShowDialog()
Uncomment the line, save, and then press F5 (or run the script). You should now see the GUI that you created earlier in all it’s glory!
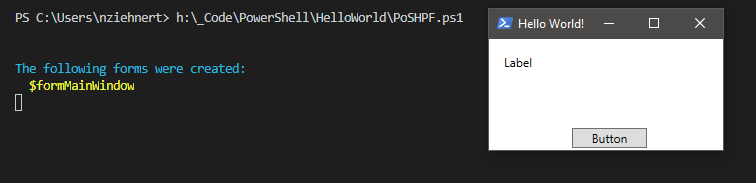
Now it doesn’t really do anything except look pretty (with a face only a developer could love), so in the next post we’ll talk about how to wire up some of these controls to do stuff for us.
If you’re interested in the magic behind what is happening here, continue reading - otherwise, happy admining!
The Magic
So here’s a basic flow of what is happening for THIS particular form. The script does much more than this that we’ll get into later - but for the purpose of just putting a window on screen, this is what happens.

I’ve designed PoSHPF in a way where you could define multiple windows. You could even expand the script to load a different window based on the result of a preview window (a future blog post on this). So the first thing we need to do is gather all of the XAML files that we’ve stored in the XAML folder. This is Line 3 of the script:
$Global:XAML = Get-ChildItem -Path "$PSScriptRoot\XAML\*.xaml" -ErrorAction SilentlyContinue
It’s just a simple “Get-ChildItem” from the $PSScriptRoot\XAML folder. Next we need to load the components necessary to run Windows Presentation Framework (WPF) dialogs. This is Line 30 of the script:
Add-Type -assemblyName PresentationFramework
Again, just a simple PowerShell command and referencing the PresentationFramework assembly by name. Now there are a handful of things that PowerShell does not like to process when reading XAML generated by Visual Studio. This is because Visual Studio adds references to the solution and some other XML stuff that won’t be available to us in the PowerShell session. PoSHPF is going to look at the code and remove this unnecessary stuff on lines 41-59:
foreach($x in $XAML) {
    # Items from XAML that are known to cause issues
    # when PowerShell parses them.
    $xamlToRemove = @(
        'mc:Ignorable="d"',
        "x:Class=`"(.*?)`"",
        "xmlns:local=`"(.*?)`""
    )
    ...
    foreach($xtr in $xamlToRemove){ $xaml = $xaml -replace $xtr } # Remove items from $xamlToRemove
    ...
}
Wherever you see “(.*?)” in the code know that it just means “anything contained between the quotes. In this way the line ‘x:Class=“DEMO:Code”’ would be removed regardless of what is between the double quotes. Now that we’ve removed most of the things that can cause parsing issues we’ll have the XAML parser convert it into an actual object we can do something with. This is lines 110-117:
$forms = @()
foreach($x in $vx)
{
    $Reader = (New-Object System.Xml.XmlNodeReader ((Get-Variable -Name "xaml$($x)").Value)) #load the xaml we created earlier into XmlNodeReader
    New-Variable -Name "form$($x)" -Value ([Windows.Markup.XamlReader]::Load($Reader)) -Force #load the xaml into XamlReader
    $forms += "form$($x)" #add the form name to our array
    $SyncClass.SyncHash.Add("form$($x)", (Get-Variable -Name "form$($x)").Value) #add the form object to our synched hashtable
}
The important line there is the one creating the “New-Variable” - the value is
-Value ([Windows.Markup.XamlReader]::Load($Reader))
Which is just taking our “XML” input and loading it via the XamlReader class. Normally this would be a single line of code, but since we’re supporting the possibility of multiple GUI Windows we have to do some looping here. Finally, we load the actual window. The window object itself has a “ShowDialog” method attached to it, so we just call that method (and ignore the output from the dialog box by prepending [void]).
[void]$formMainWindow.ShowDialog()
And that’s the magic. There is obviously a lot more code in here that we’ll describe later like how to wire up components, how to keep your GUI responsive during long running tasks, and how to reference things like pictures so that they show regardless of where the script is stored.
Until next time, happy admining!
Share this post
Twitter
Facebook
Reddit
LinkedIn
Email